BATH PANELS - TYPES & FITTING GUIDE
The following is intended as a guide only and cannot be taken as a definitive or binding document. Manufacturers' instructions when available should be followed, and the installer should be qualified and have an amount of experience and ability.
Bath panels are available in several materials, and the usage as well as the bath installation should be fully considered when selecting a panel.
Compound Saw
Acrylic panels - Main advantage waterproof.
These are moulded sheets manufactured by the bath companies to accompany their bath ranges. The sizes are limited and will allow little or no adjustment to height; it is therefore imperative that they are supplied for fitting at the same time as the bath.
The fitter must check that the height restriction will not affect the plumbing requirements ,and that the floor is relatively level. An allowance for the thickness of the floor covering should also be considered.
Some acrylic panels are supplied with clips that fit to the floor or under the bath rim, but it is advisable that a sub frame is constructed to keep the panel in place and assist reinforcement. Front and end panel combinations are relatively easy as most acrylic panels have moulded ends for this reason. Use 'Velcro' to hold the panel in place which allows easy access to the plumbing.
Cut with a fine tooth saw if necessary.
Aftercare - Clean with soap and water.
Small scratches can be polished out with a rubbing compound.
Veneered or 'wrapped' panels - often available with loose plinths which allow height adjustment.
The usual thickness of these panels is between 15 and 20mm, which means that with some bath constructions the support legs and cradles can obstruct the panel. An initial check is advisable, remembering to take into consideration the loose plinth which is fixed to the back of the main panel (effectively doubling the thickness at this point). A flush finish is advised. Although it is not incorrect to have the panel protruding over the bath rim, this will result in water collecting on the ledge and, in time, penetrating the panel.
Although these panels are relatively solid, a sub frame of at least floor and wall battens should be used.
The advantage of a loose plinth cannot be under estimated. With the correct order of installation being recommended as:
1. The bath
2. The plumbing.
3. The floor covering
4. The bath panel
As the panel is left until last it needs to fit precisely. A loose plinth allows the tolerance lost with a fixed panel.
Adjusting the height of the panel with a loose plinth.
Measure the panel and plinth height, and allow for the plinth to fit and fix behind the main panel with a suitable overlap (normally a minimum of 40mm); this gives the maximum height. Now measure the height of the bath from the floor to under the rim at both ends; if these vary and the bath is level then the floor is probably out. If the floor is not yet fitted, it is best not to fit the bath panel, but an allowance could be made if the schedule won't permit the delay.
Cutting the panel.
Wherever possible cutting should be avoided. It compromises the water resistance of the finish, and can allow water behind the finish, causing lifting, and will also allow water into the sub structure of the panel. Take special care when fitting a sectioned or detailed panel into a recess, to centralise the panel, by cutting both sides equally.
Where cuts are necessary mark and score the line to be cut to avoid splintering. Use a fine tooth saw.
Seal all cuts with a waterproof varnish; failure will invalidate the warranty.
Silicone along these cuts when the panel is fitted as it is inevitable they will be splashed.
If the bath or its frame prevents the panel sitting completely under the rim, the panel can be notched or machine rebated (if the obstruction runs the full length of the bath as with softwood strengthening battens fitted under the rim of many baths). A rebate must never be more than half the thickness of the panel frame, or encroach into any panelled detail which is thinner than the frame. The rebate must then be sealed with varnish and the top edge with silicone sealant.
Product Aftercare
Always remove water splashes after use. Use only a soft cloth.
On polyurethane or other manmade finishes use soap and a soft cloth. On wood and wood veneers check any cleaners used are suitable.
Never use bleach, neat disinfectant or household bathroom cleaners.
Black Friday Hitachi C12LSH 15 Amp 12-Inch Dual Bevel Sliding Compound Miter saw with Laser Guide and Digital Bevel Display 2011 Deals
Nov 28, 2011 05:29:08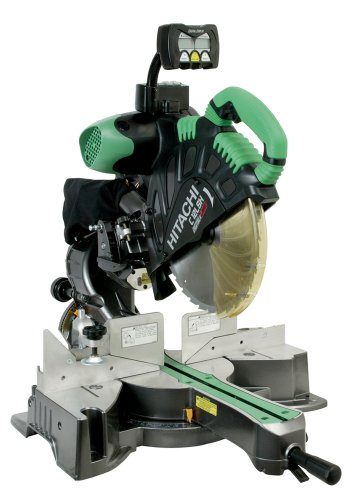
Click for larger image and other views

Black Friday Hitachi C12LSH 15 Amp 12-Inch Dual Bevel Sliding Compound Miter saw with Laser Guide and Digital Bevel Display Feature
- Powered by impressive 15-amp motor
- Includes positive stops 0, 15, 22-1/2, 31.6, and 45 degrees right and left
- The micro bevel and miter adjustment knobs dial into precise angles
- Durably and comfortably crafted with a stainless steel detent plate, carbide blade, and soft grip
- Includes TCT 60-tooth saw, blade, vise assembly, dust bag, 17-millimeter box wrench, and 5-year warranty
Black Friday Hitachi C12LSH 15 Amp 12-Inch Dual Bevel Sliding Compound Miter saw with Laser Guide and Digital Bevel Display Overview
The award-winning Hitachi C12LSH 12-Inch Sliding Dual Compound Miter Saw with Laser Marker and Digital Display provides smooth, accurate miters and crosscuts in a variety of workpieces, including wood, plywood, crown molding, decorative panels, soft fiberboard, hard board, and aluminum sashes. A top-of-the-line tool for trim carpenters, framers, and woodworkers who demand precision and reliability, the C12LSH features a compact slide system, an LCD, Hitachi's exclusive Laser Marker System, and more.
| |||||||||||||||||||||||||
 |

 Exclusive Laser Marker System ensures precision cuts. View larger. |
 Dial in precise angles with micro-miter and micro-bevel adjustment knobs. |
 Backlit LCD displays miter and bevel readings. View larger. |
Hitachi designed the C12LSH for versatile, easy use. The miter scale ranges between zero and 46 degrees to the left and zero and 57 degrees to the right, and a micro-miter knob lets you dial in precise angles. Additionally, positive miter stops allow you to easily change the angle of the cutting blade for creating miters in crown molding and other trim pieces.
The bevel scale ranges from zero to 45 degrees to the left and right, allowing your material to stay in place while you flip the saw head to make opposing cuts. After your major bevel angle is secured, a micro-bevel adjustment knob can be used to dial in a precise angle, while positive stops allow for quick and easy measurements and settings.
The 12-inch TCT saw blade (included) makes easy work of delicate trim and other woodwork, and the pivoting fence raises a height of 4-11/16 inches to allow for accurate vertical cutting of crown molding and other large workpieces.
Compact Slide System Requires Zero Clearance
With its revolutionary compact slide system, the C12LSH requires no rear clearance like other sliding saws. Hitachi's patented fixed rail system allows the saw head to glide smoothly along twin rails, which stay put and do not protrude to the rear of the saw. The result is a sliding saw that can be operated on a small work surface that has minimal rear clearance, such as up against a wall.
This innovative new feature is just one of the reasons that the Hitachi C12LSH was named one of the "Top 10 Innovative Tools for 2006" by Workbench Magazine, February 2006.
Laser Marker Technology and LCD for Perfect Cuts
Hitachi equipped the C12LSH with its exclusive Laser Marker System, which can be activated before the blade is in motion for exact alignment and predictable blade placement. The laser marker is easily adjustable to the left or right of the cut mark to suit your preferences, simply line up the laser with your mark on the workpiece, and the saw blade will make an exact cut along the laser guide. As long as your measurements are right, your cuts will be, too!
The C12LSH also includes an innovative LCD (liquid crystal display) that takes the guesswork out of miter and bevel readings and saves time by eliminating costly mistakes. This top-mounted digital scale swivels to provide clear and accurate miter and bevel readings from any angle.
Chock-Full of User-Friendly Features
The C12LSH has plenty of features to help you make the perfect cut the first time. To start, it has a powerful 15-amp motor that generates a no-load speed of up to 3,800 RPM to smoothly and easily cut through even the toughest hardwoods.
For precise, safe cutting, a fixed splinter guard increases safety and reduces tear-out for clean, finished cuts, and a comfortable vertical handle with a vibration-reducing elastomer grip prevents slippage and keeps you in control at all times.
The C12LSH also includes a dust bag that minimizes accumulation of dust and particles in your both your workspace and the saw's interior components, keeping your jobsite clean and prolonging the life of the tool. An added bonus, easily accessible carbon brushes will help your saw perform for the long term.
The Hitachi C12LSH measures 23-7/16 x 36-5/8 x 27-15/16 inches and weighs 66.1 pounds. Durably built, this tool is backed by an industry-leading five year warranty.
About Hitachi: A Tradition of Innovation
Hitachi Power Tools (Hitachi Koki USA, Ltd.) provides professional-grade power tools for a variety of applications, including woodwork, metalwork, concrete, drilling, cutting, and fastening. Hitachi is a leader in power tool research and development and has achieved many firsts in the power tool industry, including creating the first-ever sliding compound miter saw to combine the capacity of a radial arm saw and the convenience of a miter saw. Today, Hitachi continues the tradition of innovation and engineering with new features in addition to classic quality.
What's in the Box
C12LSH Sliding Dual Compound Miter Saw with Laser Marker and Digital Display, 12-inch, 60-tooth TCT saw blade, dust bag, vise assembly, and box wrench.
 The C12LSH was named one of the "Top 10 Innovative Tools for 2006" by Workbench Magazine, February 2006. |
SAVE NOW on Black Friday offers below!
Available In Stock. |
| This Black Friday Hitachi C12LSH 15 Amp 12-Inch Dual Bevel Sliding Compound Miter saw with Laser Guide and Digital Bevel Display ships for FREE with Super Saver Shipping. |
Price : Click to Check Update Prices Please. |
