Miter saws can be used in a woodworking shop as a permanently installed tool or on the jobsite as a portable or semi-portable unit. I will discuss the construction of miter saw tables appropriate to both types of installations. The purpose of a miter saw table is two-fold: (1) to elevate the saw to a comfortable working height for the operator and (2) to provide a surface to the left and/or right of the saw for the extension of the fence and to provide support for long materials while being cut. If you have ever tried to cut a 45-degree miter at one end of a 2 x 6 x 12, you know why a miter saw table or roller stand is absolutely required.
Very often, miter saws are used to make repetitive cuts of the same length. Some sort of saw stop comes in handy and greatly speeds production time for this sort of application. A saw stop must mount to something to hold it in place, usually a fence. You can make your own fence out of a very straight piece of wood or metal or you can do as I did and purchase a commercially available moveable stop that slides along an aluminum track that includes a stick-on measuring tape.
Compound Saw
PERMANENT SAW TABLE FOR SHOP USE
Since I buy lumber in lengths up to 14 feet long, I decided to build a very long miter saw table in my woodworking shop. You may not have the physical space for this in your shop so you may have to reduce my measurements accordingly. The longer you can build it, the better off it will be for you but any length of saw table is better than no table at all. My miter saw table measures 8 Feet to the left of the saw blade and another 8 feet to the right of the saw blade. This way, I can support the full length of a sheet of plywood on either side.
The saw table is constructed over 2 x 4 framing and contains multiple storage drawers below the table which I use to store small tools and supplies. If you prefer, the space underneath the saw table can be left open for shelf space or lumber storage. I suggest that the top surface be 3/4" Melamine or Formica over 3/4" particle board. If you can use the entire 4-foot width of the Melamine or particle board, by all means do so, especially if your miter saw is of the "sliding compound miter" type. As for overall table height, I would suggest that you build the miter saw table so that the top of the table comes to your belt line when standing. This will give you a comfortable working height and still allow you to bend over the table.
There should be a gap cut through saw table top in the area where the saw is to be mounted. This gap must be exactly as wide as the top of your miter saw and must be open to the front of the table. The gap should close behind the top of the miter saw. The saw must be mounted in this gap so that the top of the miter saw table is flush with the top of the saw table. The miter handle must be free to move its full travel in both directions, left to right.
Anticipate the need for this gap as you are framing the underside of your miter saw table because you will need to construct a shelf underneath to support the weight of the miter saw. You might want to make this shelf adjustable in micro increments so that you can get the top of the saw platform exactly flush to the top of the saw table. You can do this with lag screws with washers in sliding slots through the shelf sub-structure and into the table framing. Slightly loosen the lags and tap the table up or down with a rubber hammer before tightening the lags fully. Use a long straightedge in all directions to make sure that the miter saw and the miter saw table are flush with each other. Mount the saw securely to the shelf using lag screws.
Once the miter saw is mounted, you can begin to construct the fence or fences. A simple, inexpensive fence can be constructed using 1 x 4 or 1 x 6 clear fir boards. These boards should be hand selected for straightness and jointed on one edge. One board will be the actual fence and the other will keep it straight from behind. The fence sits with its jointed edge on the saw table top while the back-up board lies flat on the table, behind the fence, with its jointed edge joined to the bottom of the fence.
Before joining the two boards together, slotted holes should be cut into the back-up board for the purpose of mounting and adjusting the fence position on the table top with reference to the fence on the miter saw. These slots should be slightly wider than the shaft diameter of the lag screws you intend to use to mount the fence to the table. Cut a few equally spaced slots in the back-up board perpendicular (at right angle) to the fence. A 2 x 4 joist should be located under the table top, centered underneath the slots in the back-up board. This will give the lag screws something solid to bite into.
Before mounting the fence or fences to the miter saw table top, draw a pencil or chalk line where the front of the fence is to be positioned. Take a long straightedge, lay it flat on the miter saw's metal table and push one edge of it long the miter saw's metal fence. Keeping it in this position, draw a pencil line along the table top, out as far as possible. Repeat on the opposite side of the saw if you have tables on both sides of the saw. Extend this pencil line as far as possible.
Place the fence along the pencil line with the end of the wooden fence almost touching the end of miter saw's metal fence. (Leave a 1/16" gap between the wooden fence and the metal fence.) Drill appropriately sized holes for the lag screws through the table top and into the 2x4 joist underneath the table top (one for each slot). Screw the fence to the table loosely so that it can be adjusted. Use the long straight edge on the miter saw's table and on the front of the fence to align the fence perfectly and screw down tightly. Repeat for the other side of the table if there is one.
For the left fence, place a "right to left" reading stick-on measuring tape along the top of the fence. For the right fence, place a "left to right" reading stick-on measuring tape along the top of that fence. Before sticking down, the tapes must be aligned perfectly. The left tape is measuring the distance from the left side of the saw blade teeth and the right tape is measuring the distance from the right side of the saw blade teeth. With a simple wooden fence like this, you can use wooden stop blocks clamped to the fence with C-clamps for repetitive cuts.
A slightly more expensive and far better alternative is to use a metal track or tracks with a flip-up stop and measuring tape built in. Such a device is manufactured by Kreg Tools and is available in 4-foot track lengths that can be butted together to make longer lengths. My miter saw table requires four 4-foot tracks, two for each side of the saw. The track is mounted to the top of the wooden fence you just made. You will have to adjust the height of the wooden fence (2 1/4"+ above the table top) so that the bottom of the flip-up stop clears the table by about 1/16" in the down position.
The nice thing about the flip-up stop is that it can be flipped up out of the way without loosing its measurement setting along the measuring tape. If you were making repetitive cuts and you needed to stop to use the saw momentarily for a different kind of cut, you could resume your repetitive cutting immediately without losing any accuracy.
PORTABLE MITER SAW TABLE FOR JOBSITE USE
A jobsite miter saw table is usually made with the saw mounted to the extreme right end of the table. I have found that most miter saw manufacturers make their metal table surfaces so that they are 3 1/2" above the table on which the saw is resting. A very straight, milled 4 x 4 (3 1/2" x 3 1/2") can be mounted onto the table top, almost abutting the left side of the metal table of the saw. The 4 x 4 should extend out the full length of the supporting table to the left and be mounted to the supporting table.
A fence can be attached to the back side of the 4 x 4. Use a 1 x 6 or 1 x 8 clear fir board for this purpose. As in the permanent table above, the front of the fence must align perfectly with the miter saw's metal fence. If a wider support surface is needed, a second 4 x 4 can be mounted directly in front of the one with the fence attached to it. A Kreg Trak system with a flip-up stop can also be used on this portable miter saw table. Just make sure the wooden fence is ripped to the proper height to allow the flip-up stop to clear the table by 1/16". (Fence is 2 1/4" + above the top of the 4 x 4.)
As for the support table, I have used a plastic fold-up table from Costco. They come in various sizes to suit your particular need. Or, you can make your own table out of 2 x 4's and 3/4" plywood. Design it so that the legs can fold up for transportation and storage.
Special Price!!! Hitachi C12LSH 15 Amp 12-Inch Dual Bevel Sliding Compound Miter saw with Laser Guide and Digital Bevel Display
Oct 20, 2011 20:09:40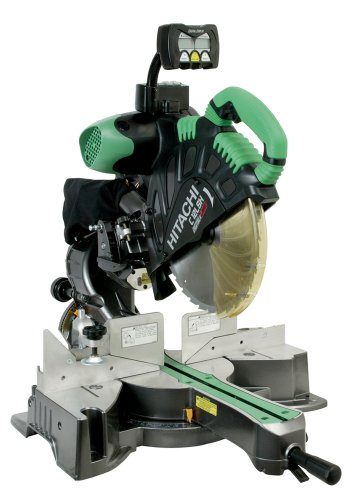
Click for larger image and other views

Hitachi C12LSH 15 Amp 12-Inch Dual Bevel Sliding Compound Miter saw with Laser Guide and Digital Bevel Display Feature
- Powered by impressive 15-amp motor
- Includes positive stops 0, 15, 22-1/2, 31.6, and 45 degrees right and left
- The micro bevel and miter adjustment knobs dial into precise angles
- Durably and comfortably crafted with a stainless steel detent plate, carbide blade, and soft grip
- Includes TCT 60-tooth saw, blade, vise assembly, dust bag, 17-millimeter box wrench, and 5-year warranty
Hitachi C12LSH 15 Amp 12-Inch Dual Bevel Sliding Compound Miter saw with Laser Guide and Digital Bevel Display Overview
The award-winning Hitachi C12LSH 12-Inch Sliding Dual Compound Miter Saw with Laser Marker and Digital Display provides smooth, accurate miters and crosscuts in a variety of workpieces, including wood, plywood, crown molding, decorative panels, soft fiberboard, hard board, and aluminum sashes. A top-of-the-line tool for trim carpenters, framers, and woodworkers who demand precision and reliability, the C12LSH features a compact slide system, an LCD, Hitachi's exclusive Laser Marker System, and more.
| |||||||||||||||||||||||||
 |

 Exclusive Laser Marker System ensures precision cuts. View larger. |
 Dial in precise angles with micro-miter and micro-bevel adjustment knobs. |
 Backlit LCD displays miter and bevel readings. View larger. |
Hitachi designed the C12LSH for versatile, easy use. The miter scale ranges between zero and 46 degrees to the left and zero and 57 degrees to the right, and a micro-miter knob lets you dial in precise angles. Additionally, positive miter stops allow you to easily change the angle of the cutting blade for creating miters in crown molding and other trim pieces.
The bevel scale ranges from zero to 45 degrees to the left and right, allowing your material to stay in place while you flip the saw head to make opposing cuts. After your major bevel angle is secured, a micro-bevel adjustment knob can be used to dial in a precise angle, while positive stops allow for quick and easy measurements and settings.
The 12-inch TCT saw blade (included) makes easy work of delicate trim and other woodwork, and the pivoting fence raises a height of 4-11/16 inches to allow for accurate vertical cutting of crown molding and other large workpieces.
Compact Slide System Requires Zero Clearance
With its revolutionary compact slide system, the C12LSH requires no rear clearance like other sliding saws. Hitachi's patented fixed rail system allows the saw head to glide smoothly along twin rails, which stay put and do not protrude to the rear of the saw. The result is a sliding saw that can be operated on a small work surface that has minimal rear clearance, such as up against a wall.
This innovative new feature is just one of the reasons that the Hitachi C12LSH was named one of the "Top 10 Innovative Tools for 2006" by Workbench Magazine, February 2006.
Laser Marker Technology and LCD for Perfect Cuts
Hitachi equipped the C12LSH with its exclusive Laser Marker System, which can be activated before the blade is in motion for exact alignment and predictable blade placement. The laser marker is easily adjustable to the left or right of the cut mark to suit your preferences, simply line up the laser with your mark on the workpiece, and the saw blade will make an exact cut along the laser guide. As long as your measurements are right, your cuts will be, too!
The C12LSH also includes an innovative LCD (liquid crystal display) that takes the guesswork out of miter and bevel readings and saves time by eliminating costly mistakes. This top-mounted digital scale swivels to provide clear and accurate miter and bevel readings from any angle.
Chock-Full of User-Friendly Features
The C12LSH has plenty of features to help you make the perfect cut the first time. To start, it has a powerful 15-amp motor that generates a no-load speed of up to 3,800 RPM to smoothly and easily cut through even the toughest hardwoods.
For precise, safe cutting, a fixed splinter guard increases safety and reduces tear-out for clean, finished cuts, and a comfortable vertical handle with a vibration-reducing elastomer grip prevents slippage and keeps you in control at all times.
The C12LSH also includes a dust bag that minimizes accumulation of dust and particles in your both your workspace and the saw's interior components, keeping your jobsite clean and prolonging the life of the tool. An added bonus, easily accessible carbon brushes will help your saw perform for the long term.
The Hitachi C12LSH measures 23-7/16 x 36-5/8 x 27-15/16 inches and weighs 66.1 pounds. Durably built, this tool is backed by an industry-leading five year warranty.
About Hitachi: A Tradition of Innovation
Hitachi Power Tools (Hitachi Koki USA, Ltd.) provides professional-grade power tools for a variety of applications, including woodwork, metalwork, concrete, drilling, cutting, and fastening. Hitachi is a leader in power tool research and development and has achieved many firsts in the power tool industry, including creating the first-ever sliding compound miter saw to combine the capacity of a radial arm saw and the convenience of a miter saw. Today, Hitachi continues the tradition of innovation and engineering with new features in addition to classic quality.
What's in the Box
C12LSH Sliding Dual Compound Miter Saw with Laser Marker and Digital Display, 12-inch, 60-tooth TCT saw blade, dust bag, vise assembly, and box wrench.
 The C12LSH was named one of the "Top 10 Innovative Tools for 2006" by Workbench Magazine, February 2006. |
SAVE NOW on the special offers below!
Available In Stock. |
| This Hitachi C12LSH 15 Amp 12-Inch Dual Bevel Sliding Compound Miter saw with Laser Guide and Digital Bevel Display ships for FREE with Super Saver Shipping. |
Price : Click to Check Update Prices Please. |

Limited Offer Today!! Hitachi C12LSH 15 Amp 12-Inch Dual Bevel Sliding Compound Miter saw with Laser Guide and Digital Bevel Display Black Friday and Cyber Monday Deals
Speakers For Projector Quinny Stroller Black And Decker Food Processor