Learning how to build a shed roof often slows people down when it comes to shed building. It seems that the walls are easy because they are square and stand straight up but when it comes to sloping roof angles and rafters that hang over the edges of the walls or cutting the birds' mouth on a rafter that many people get stumped. This article outlines the basic steps to building a shed roof with a 4/12 pitch and a peak in the middle to hopefully take some of the mystery out of shed roof building.
Plumb The Walls
Compound Saw
The first step is to make sure that all the walls are plumb and square which means that they are standing straight up and down and that the corners are square. These two items are important because once the roof trusses or rafters are installed the walls will be permanently stuck in whatever position they are in.
Put a level on the side of the shed and moving the walls until they are straight and then bracing them in place with pieces of scrap wood. Having crooked walls is more of a problem on larger sheds because there is more distance for things to get out of square. Check the shed walls for square by measuring diagonally from corner to corner. Push the corners in or out until the two dimensions are the same.
Design The Shed Roof Rafters
After squaring up the shed walls the next step in learning how to build a shed roof is to design the roof rafters. This is simpler than it sounds. If you do not have a drawing of the roof trusses in your shed plans then the easiest way to design a roof rafter is to draw it out full size on the floor and then cut out the rafter and fit it to the full size drawing on the floor. The most common roof slope for sheds is 4/12. What this means is that for every 4 inches that the roof goes vertically up into the air it goes 12 inches horizontally across the wall. A 4/12 slope is the minimum slope that is allowed by shingle manufactures so that they can guarantee their product. These are the steps to draw a 4/12 pitch roof rafter on the ground.
Draw The Shed Roof Rafters On The Ground
Make a straight line on the ground as long as the width of the shed. We will call this This is the Width Of Shed Line. Measure the exact width of the shed on the top plates of the walls and put two marks on the Width Of Shed Line showing this distance. Measure in 4 inches from the outer marks on each end and put a second set of marks. We will call these the inner and outer marks. You will draw from the two inner marks at the 4/12 angle toward the center to designate the bottom of the shed roof rafters. Find the center point on the Width Of Shed Line between the two outer marks and mark it on the line. Draw a line from the center mark perpendicular to the Width Of Shed Line. Draw this perpendicular line a foot or two long. It may need to be extended later if you have a shed that is fairly wide.
Draw The 4/12 Pitch Line
The 4/12 pitch line will be the line and angle that the roof rafters will sit on. You will be drawing a triangle on the Width Of Shed Line.
The simplest way to do this is to locate the two inner marks on the Width Of Shed Line and measure 1 foot towards the center. At the new 1 foot mark you will use the square to make a perpendicular line straight up 4 inches and put a mark at the 4 inch spot. Use a straight 2x4 to draw a line from the mark that is 4 inches in through the point that is 4 inches up and to the perpendicular Width Of Shed Line. Then repeat this process on the other end of the Width Of Shed Line. When the two angled lines meet they should intersect on the center line that you drew earlier. If all three lines do not intersect then you need to double check the measurements and correct your lines.
The two angled lines represent the bottom edge of the roof rafters and the great thing is that all the angles used to cut out your roof rafters are now drawn out on the ground. You simply need to transfer them to the first rafter and you are on your way to framing the shed roof.
Transfer The Rafter Lines From The Ground To A Rafter
Transfer the angles and lines onto a 2x4 piece of wood by putting a 2x4 that is long enough to extend past the marks on the Width Of Shed Line and the marks where the three lines intersect on the perpendicular line.
Place the board on the upper side of the line, the side outside the triangle. Use your square to transfer the marks on the floor onto the board.
Cut Rafter Birds Mouth And Peak
The two ends of the board are cut differently.
The top or peak end will be cut off so that the two rafters can butt up to each other where they meet in the middle. Use a circular saw to cut the board at the peak. Put the board back on the lines to make sure the peak lines up well with the vertical line and the bottom of the rafter line. The lower end will get a special cut called a birds mouth cut that will allow the bottom end of the rafter to sit on the shed wall and at the same time extend past the shed wall to form a overhang. Draw the birds mouth shape on the lower end of the rafter by tracing 4" horizontally along the Width Of Shed Line toward the outer mark and then down and off the board. This shape will create a "seat" in the rafter that will sit on the shed wall. After you draw the shape on the lower end of the rafter you will take the circular saw and cut the shape out. You will need to use a hammer and chisel to finish off the cut. Place the rafter on the drawing on the floor and check the cuts against the lines. When you are happy with the shape place the newly cut out rafter on a second piece of 2x4 wood and trace the cut lines so you can make a second rafter. Cut the second rafter out and then place both rafters on the lines of the drawing and check for a good fit against each other and the lines on the ground.
Attach A Gusset
A gusset is a piece of wood that attaches the two rafters together. Use a Piece of Plywood or O.S. B. to make a gusset and attach the two rafters to each other at the peak.
Make sure that both of the rafters are exactly on the lines on the ground. Cut out a gusset from a piece of O.S.B. The gusset should extend down the rafters from the peak about twice the width of the 2x4 rafter or about 7 inches. Attach the gusset to both of the rafters. Put three nails through the O.S.B. into each of the rafters.
Test the shed roof rafters by putting them up on the shed walls and verifying the birds mouth cuts.
If you are happy with the rafters then you are ready to use them as a template to build the rest of the shed roof rafters. Build enough shed roof rafters to have one set at each end and then every 24" along the shed walls. When you have all the rafters built you are ready to start framing the shed roof.
Christmas Sales Makita LS1221 12-inch Compound Miter saw Kit 201
Dec 17, 2011 22:54:46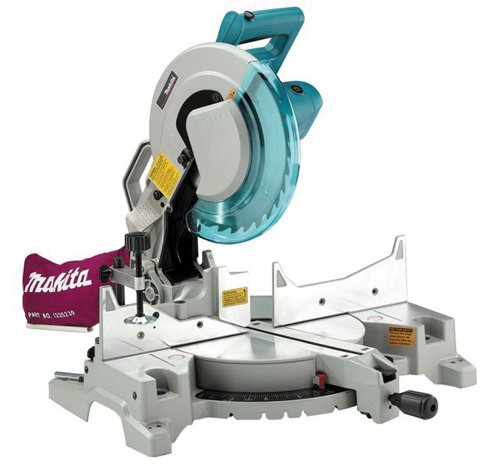
Click for larger image and other views

Christmas Sales Makita LS1221 12-inch Compound Miter saw Kit Feature
- 12-inch compound miter saw kit; easily handles a 4 x 6 at 90-degrees
- 15 amp motor delivers 4,000 rpm; horizontal D-handle; positive stops at 9 settings
- Carbide-tipped blade; fiber-reinforced polycarbonate and aluminum coating
- Includes vise, blade, 2 extension wings, socket wrench, dust bag
- 24 by 26-1/2 by 23-7/8-inches; 36.4-pounds; 1-year warranty
Christmas Sales Makita LS1221 12-inch Compound Miter saw Kit Overview
Why buy a compound miter saw? While a standard miter swings left or right at varying angles of the centerline, a compound miter also swings on a bevel, allowing you to cut a bevel and an angle simultaneously. This is invaluable if you are working on projects that require compound cuts, such as crown molding.As compound miters go, it's hard to do better than the Makita. At just over 36 pounds, this is among the lightest of the 12-inch miters, yet it doesn't feel flimsy at all. The swing arm is substantial, and I was able to make accurate cuts easily over and over again. The 4-1/2-inch fence is not as high as other models (fences for 12-inch saws typically average around 5 inches), but is perfectly fine for most applications.This is one quiet machine, which is great if you're going to be using it all day, and the horizontal, D-style handle is comfortable to use right- or left-handed (although, like most compound miters, the LS1221 bevels only in one direction).On the down-side, the miter and bevel scales are a little difficult to read compared to other models. But given the overall quality, portability, accuracy, and the sturdy construction, this is indeed a minor complaint.Christmas Sales Makita LS1221 12-inch Compound Miter saw Kit Specifications
Makita's LS1221 12-Inch Compound Miter Saw combines power, performance, and ease of use for common miter cuts, including a range of applications in woodworking, cabinetry, deck building, framing, and more. View larger | ||||
|


| ||||||||||||||||||||
| ||||||||||||||||||||

The LS1221 has a dynamically balanced 15-amp direct-drive motor with 4,000 rpm for improved performance and is engineered to never slip or bog down like belt-drive units. The electronic speed control maintains constant speed under load.
Precise Miter and Bevel Cuts
The LS1221 has a large capacity (3-7/8 inches x 6 inches at 90 degrees), with a 4-1/2-inch tall pivoting fence for cutting up to 5-1/2-inch crown molding and a pivoting fence for supporting larger stock. The saw has 9 positive miter stops at 15, 22.5, 31.6, and 45 degrees (left or right), and 0 degree (90-degree cuts). The engineered aluminum base ensures accurate cuts. Ease-of-use features include a horizontal D-handle design for easy and comfortable operation and a compact size (weighs only 37 pounds) for easy portability.
Best in Class for a Range of Applications
The LS1221 is engineered for a broad range of trades, including finish carpenters, professional woodworkers, case and base installers, cabinet installers, decking and flooring applications, siding installers, and general contractors seeking a superior 12-inch compound miter saw for the jobsite or the benchtop. The LS1221 is just another example of Makita's commitment to innovative technology and best-in-class engineering.
About Makita Saws
Cut after cut, Makita saws deliver power, performance, and capacity with less weight and more ease-of-use features. Makita has a full range of corded and cordless saws and blades for cutting wood, metal, and masonry, including table saws, miter saws, reciprocating saws, circular saws, jig saws, metal cutting saws, plunge saws, and more, as well as a complete line of blades and accessories.
![]() About Makita
About Makita
Makita is a worldwide manufacturer of industrial-quality power tools and offers a wide range of industrial accessories. Makita applies leading-edge innovation to engineer power tools that are compact and energy efficient, yet deliver industrial-strength power and results. Makita U.S.A., Inc. is located in La Mirada, California, and operates an extensive distribution network located throughout the U.S. For more information, please call 800/4-MAKITA (800/462-5482) or visit makitatools.com. Makita is Best-in-Class Engineering.
Warranty
Every Makita tool is thoroughly inspected and tested before leaving the factory. If you are not satisfied with any Makita tool within 30 days of purchase, return it and Makita will provide a replacement or refund. Each Makita tool is warranted to be free of defects from workmanship and materials for the period of ONE YEAR from the date of original purchase. Should any trouble develop during this one-year period, return the COMPLETE tool, freight prepaid, to one of Makita's Factory or Authorized Service Centers.
What's in the Box
Makita LS1221 12-Inch Compound Miter Saw, 12-inch C.T blade, vertical vise, extension wings, wrench, and dust bag.
SAVE NOW on Christmas Sales Offers below!
Available In Stock. |
| This Christmas Makita LS1221 12-inch Compound Miter saw Kit ships for FREE with Super Saver Shipping. |
Price : Click to Check Update Prices Please. |
